Some links in this post are from our partners. If a purchase or signup is made through our partners, we receive compensation for the referral.
When I was 23 years old, I had just graduated business school and I knew I wanted to start investing. But I didn’t know where to start, it all seemed too complex and quite frankly, overwhelming.
Until one evening I googled (I remember this vividly), “how to start investing as a beginner”. And sure enough, Wealthsimple showed up.
I thought I may have seen some of their TV commercials and I knew they were a reputable brand, so I decided to give them a shot. Am I ever glad I did.
30 minutes later, after an easy sign-up process I had opened up my first ever investment account with Wealthsimple Invest.
That was back in 2016, and still today all of my RRSP and TFSA investments are held within my Wealthsimple account.
I’ve had such a great experience with them and I always recommend them to anyone who was once in my situation looking to open up their first investment account.
Now before I walk you through the step by step process on how to create an account, I want to outline some of the many advantages Wealthsimple offers and the benefits they’ll provide to you.
Important Note: Wealthsimple Invest is Wealthsimple’s automated investment product which is a much more hands off style of investing, which some people love. However, if you’re someone who wants to manage your entire portfolio yourself, by buying and selling individual stocks and ETFs, then you’ll want to setup an account with Wealthsimple’s online brokerage product, Wealthsimple Trade.
10 Reasons Why You Should Open Up a Wealthsimple Invest Account
| Benefits | Why It’s Good for You |
|---|---|
| 1. Creating an account is 100% free | No bogus sign-up fees. You keep more of your money |
| 2. No minimum deposit required | You can start investing with as little as $1 |
| 3. Designed for beginner investors | You can basically know nothing about investing and still be able to use and understand Wealthsimple |
| 4. Quick and easy account sign-up process | You don’t have to leave your house or wait in a line at a bank |
5. Passive investing | You simply set your risk level (1-10) at the start and then let Wealthsimple do the rest |
| 6. No deposit or withdrawal fees | It costs you no money to deposit or withdraw your money |
| 7. Low Management Fees (.5%) | You keep more of your money and retire quicker |
| 8. Great mobile experience | You can manage your entire account from your smartphone |
| 9. Modern user interface | The interface is so easy to navigate and find exactly what you’re looking for |
| 10. Amazing customer support | You can talk to Wealthsimple directly on the phone if you ever have an issue |
“I never rate companies, but Wealthsimple deserves recognition. Above all, their customer service has outdone any bank I’ve ever worked with”
– Chelsea Sheff
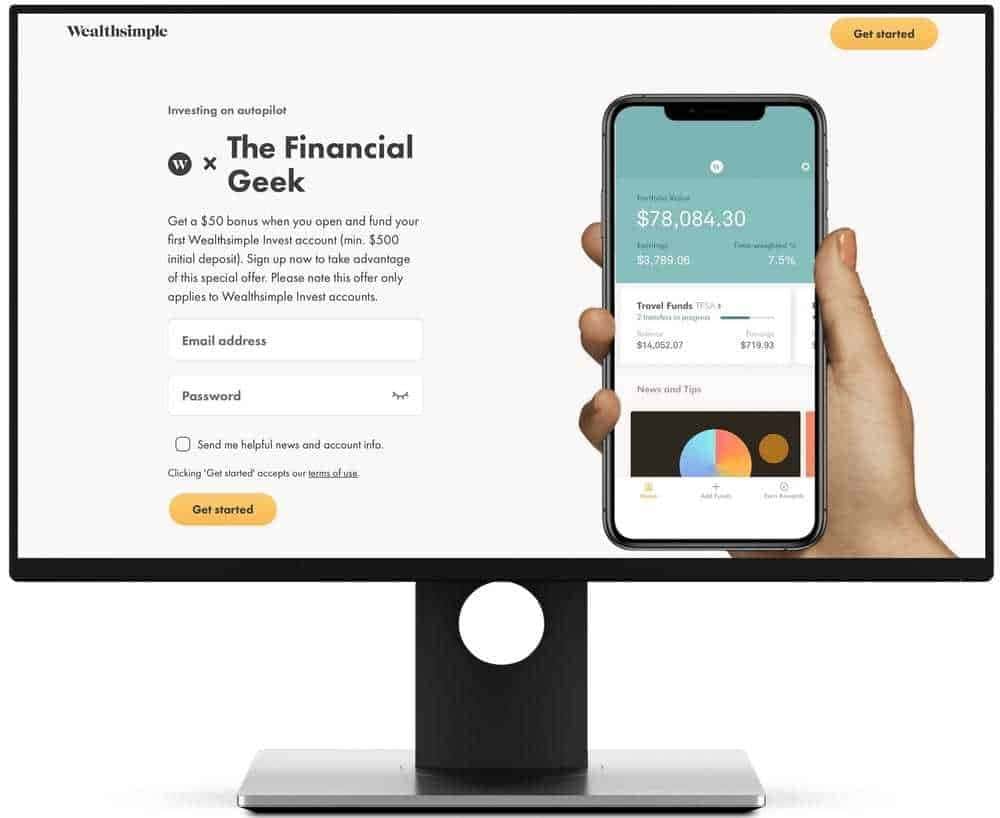
Sign-up for Wealthsimple Invest Today
It pays extra to direct deposit
You could increase your Cash account interest by 0.5% with direct deposit.
How to Open a Wealthsimple Invest Account | 4 Step Guide
Okay, now it’s time to get started.
If you haven’t already, start by going to Wealthsimple’s sign up page. Click Getting Started.
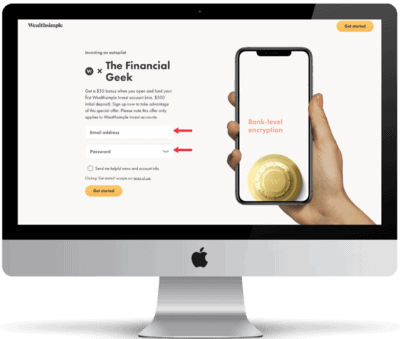
Now you should be seeing the page that is shown below. Simply enter your email address that you want associated with your new investment account and then put in a password you’ll remember.
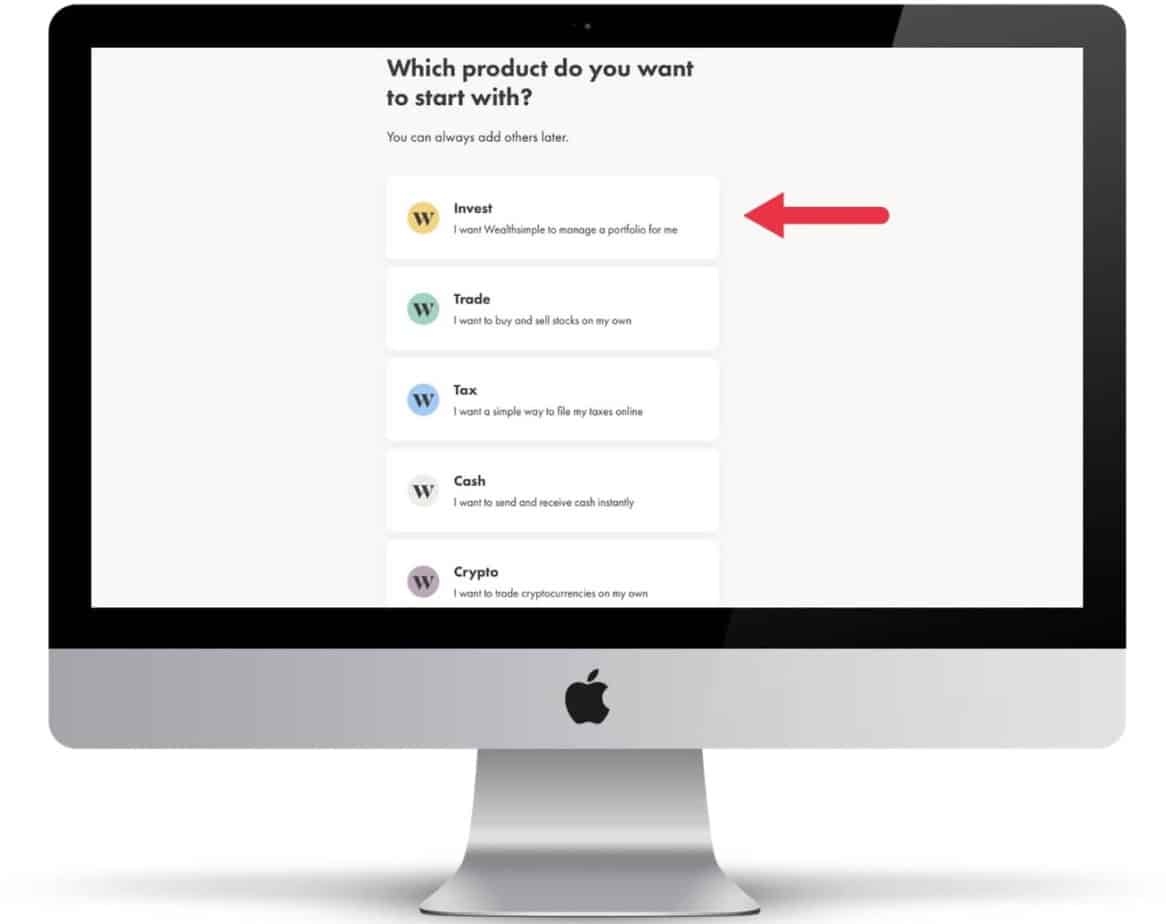
Next you’ll be asked to choose what Wealthsimple product you want to start with. You’ll want to select “Invest” as indicated in the image below as this is the platform that is most used by beginner investors.
Step 1 – Add Your Personal Details
[Estimated Time of Completion for Step #1 – 10 Minutes]
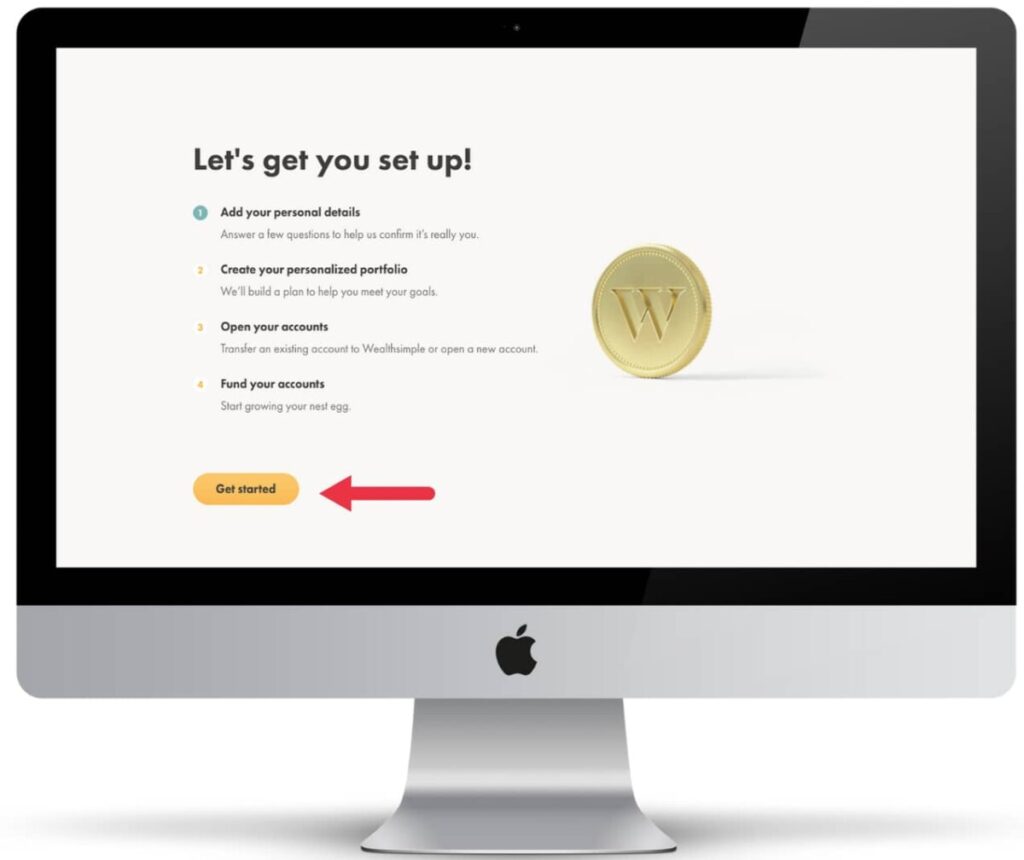
Now it’s time for step one. In step one you’ll be asked to fill out some personal details. So click “Get started” and let’s get going!
| List of Personal Detail’s You’ll Be Asked |
|---|
| 1. First Name |
| 2. Last Name |
| 3. Date of Birth |
| 4. Phone Number |
| 5. Citizenship |
| 6. Gender (Can select “Rather Not Say”) |
| 7. Residential Address |
| 8. Mailing Address |
| 9. Employment Status |
| 10. Current Workplace |
| 11. What Type of Company Is it |
| 12. Role at Your Company |
| 13. Social Insurance Number |
| 14. Do These Statements Apply To You Section |
| 15. How Did You Hear About us? |
| 16. Confirm Details |
It’s important to note that, just like the big banks in Canada, Wealthsimple is regulated by the IIROC and is totally safe to give your SIN number and other personal information to. As Wealthsimple investors are insured by the CIPF, you won’t lose money from hackers or in the unlikely event that Wealthsimple goes bankrupt.
Once you’ve completed filling out all your personal details, you’ll move into step two of the process. In step two you’ll fill out information in regards to your risk tolerance and your current and desired financial situation.
Step 2 – Create Your Personalized Your Portfolio
[Estimated Time of Completion for Step #2 – 10 Minutes]
Okay, now moving on to step two. As just mentioned, here is where you will fill out some more information on what type of risk you wish to invest with in order for Wealthsimple to personalize your portfolio for you.
So click “Continue” and let’s keep moving forward through the sign-up process.
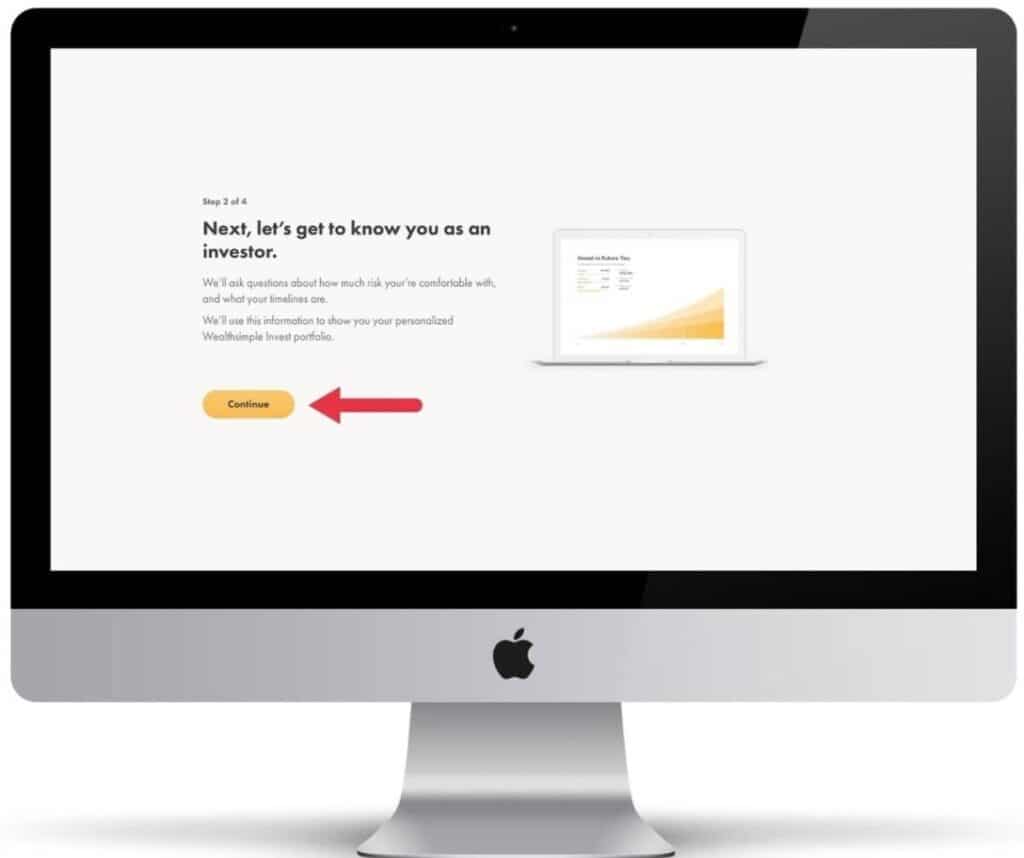
Once you click continue, you’ll know be asked a series of ten questions.
It’s important to note that all these questions will either be multiple choice or fill in a number based such as “how much money do you have saved?”. In other words, you won’t have to write out any long answers or anything time consuming like that.
| Question’s You’ll Be Asked to Personalize Your Portfolio |
|---|
| 1. Are you thinking about retirement? |
| 2. What’s the main reason for investing? |
| 3. When would you like to retire? |
| 4. What will your household income be this year? |
| 5. How much money do you have saved? |
| 6. What’s the value of property and other assets you own? |
| 7. What’s the value of your debts? |
| 8. How much do you know about investing? |
| 9. Do you have an idea of much risk you’re willing to take? |
| 10. Choose a theme for your first account |
The three investment themes that Wealthsimple offers are Socially Responsible, Classic and Halal. I invest with Classic but what you decide to do is of course up to you. If you want to learn more about each theme, you can click the learn about link below each option.
Once you’ve answered these ten preference questions, you’ll be recommended a portfolio type based on your answers. As you can see below, I was recommended the Balanced Classic Portfolio.
The three main portfolio types Wealthsimple offers are Conservative, Balanced and Growth.
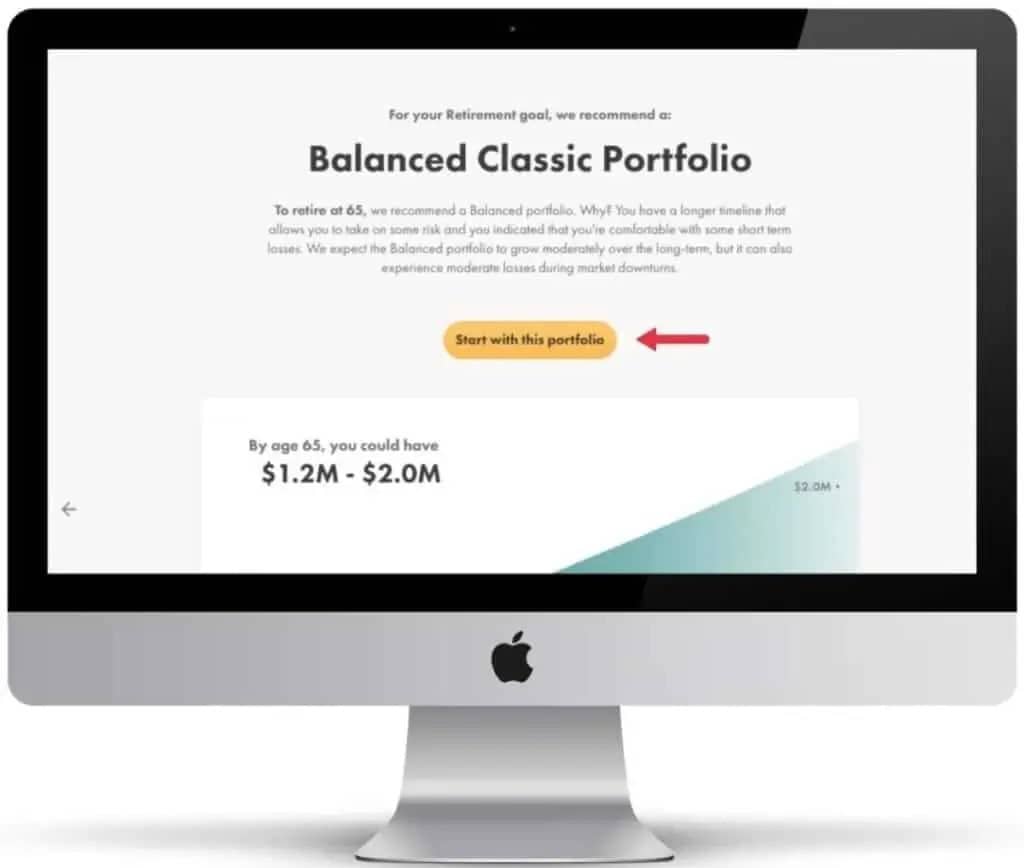
It’s also important to note that you aren’t locked into these portfolio types by any means and you can quickly and easily change your risk preferences within your settings after you’ve signed up.
For now, if you are satisfied with your portfolio recommendation, click “Start with this Portfolio” as shown in the image above.
Once you finish step two you’ll move right into step three which is where you’ll actually open your first account.
You are almost there!
Step 3 – Open Your Wealthsimple Account
[Estimated Time of Completion for Step #3 – 5 Minutes]
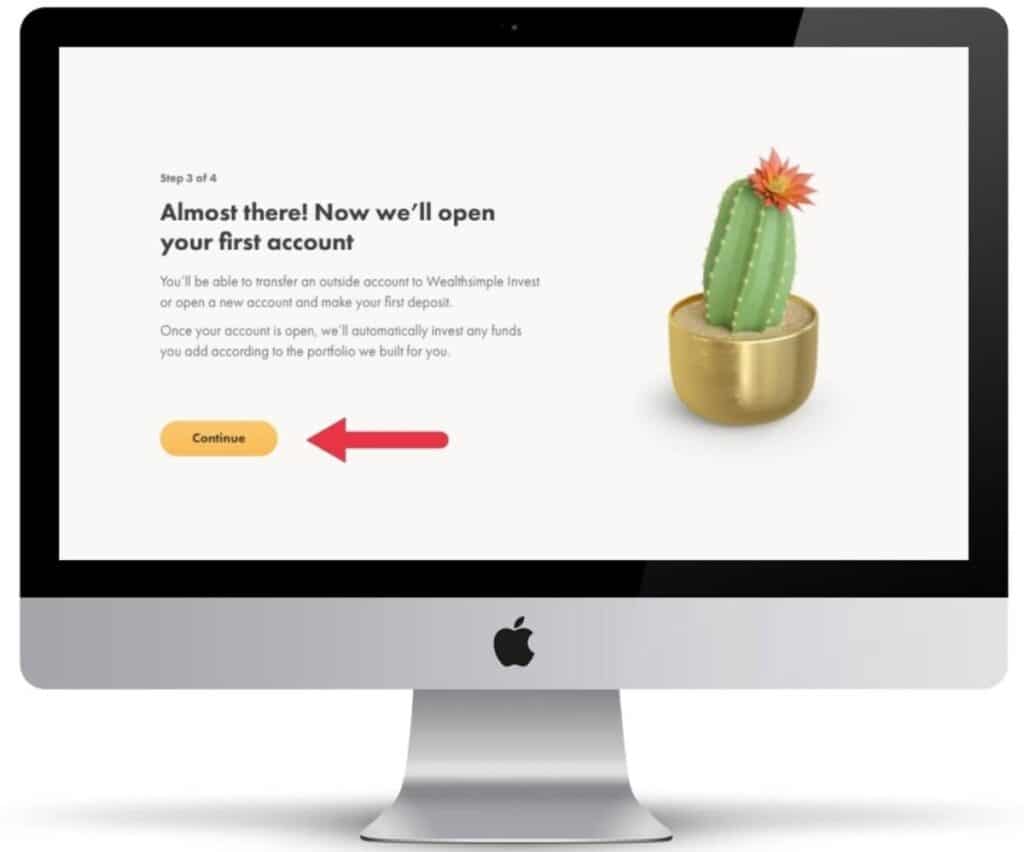
Okay, moving on to step three. You’ll start off this step by clicking “Continue” when you get to this page here.

From there you’ll be asked if you are transferring an existing investment account or opening a new one. Unless you have another investment account that you want to transfer into Wealthsimple, select “No, I’ll start with a new Wealthsimple account.”
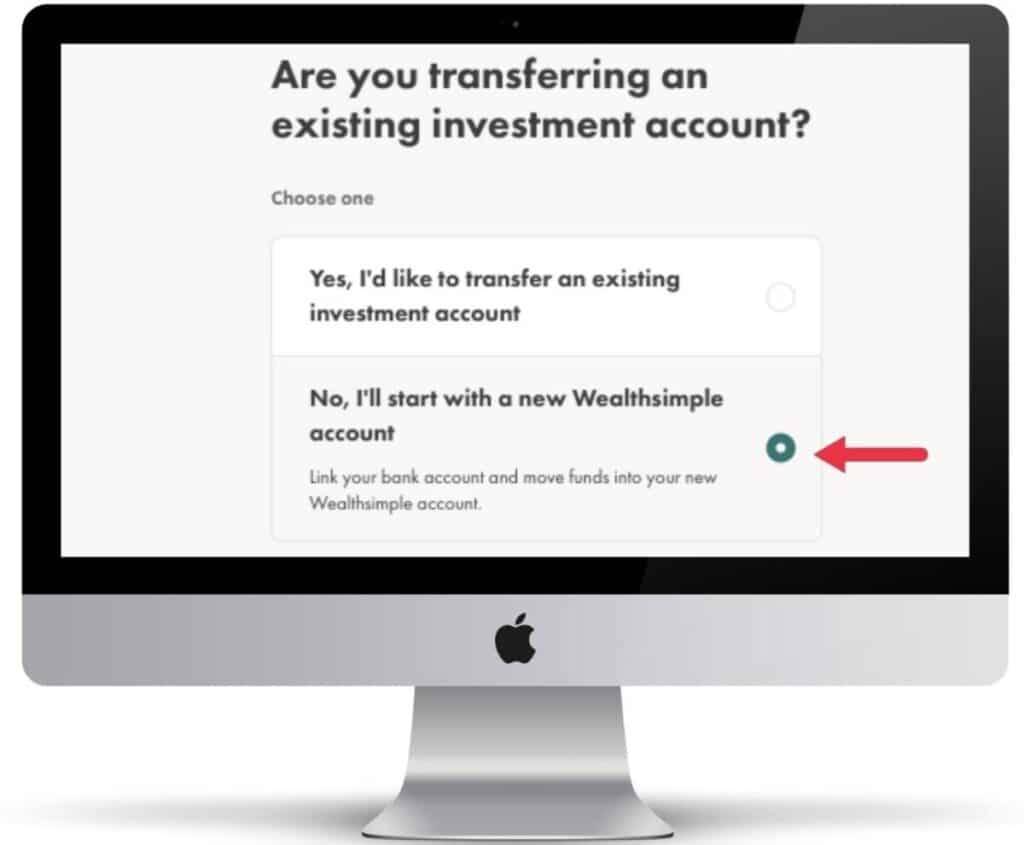
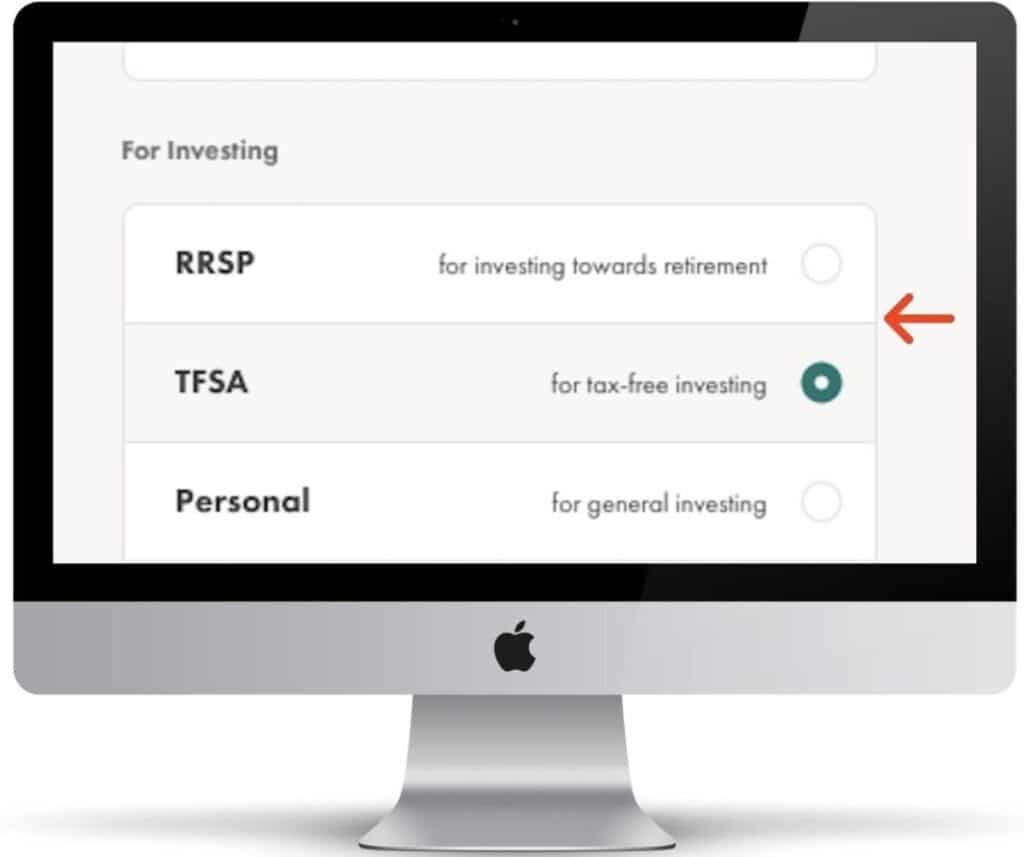
You’ll now be asked what type of account you want to open. If you want to open an account to save for retirement, open an RRSP. If you want to invest but think you may want to make withdrawals over time, open a TFSA.
If you’re not sure, go with a TFSA. That way you can withdraw your money if needed without any tax consequences.
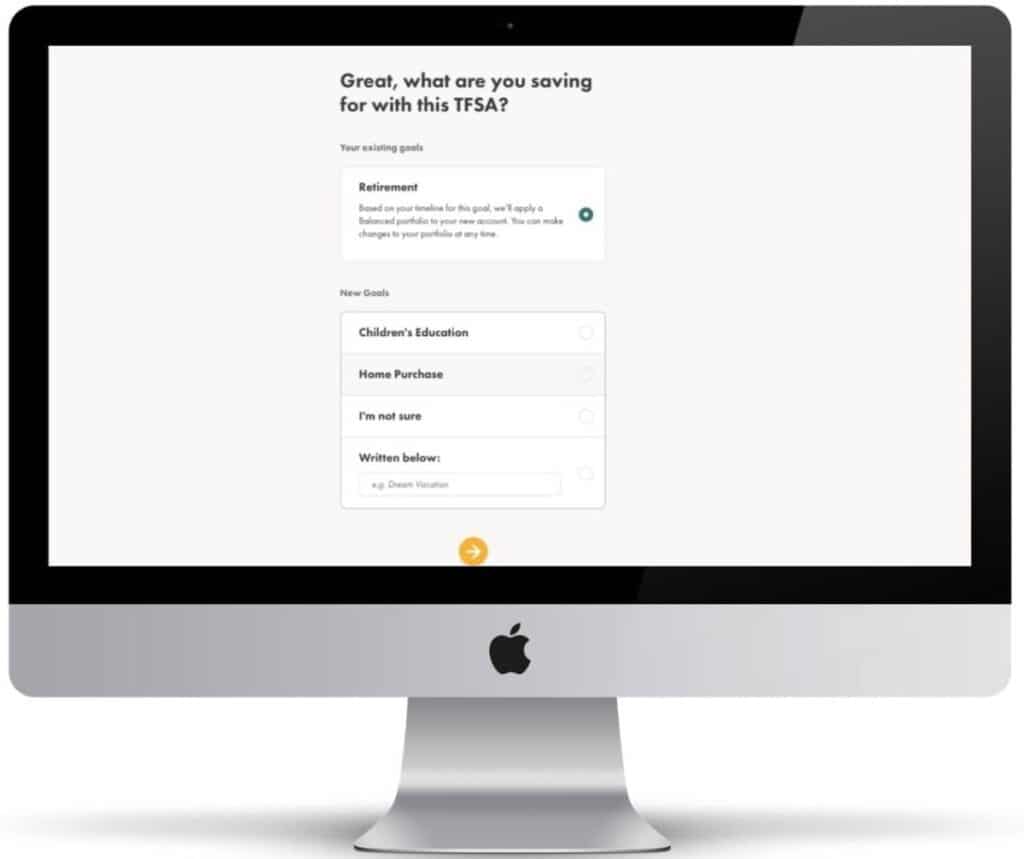
From there you’ll be asked about what are your goals with your new account, select some options that make sense for you and then move on.
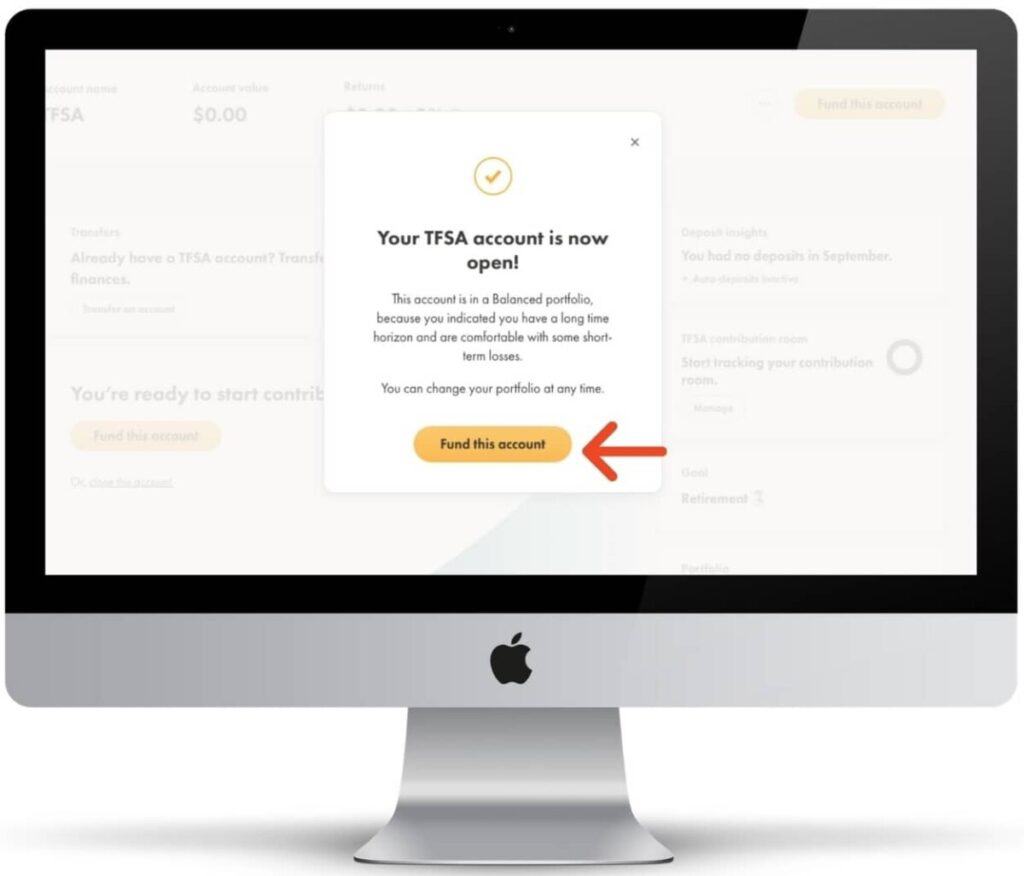
After you finish selecting your goals, you’ll be asked to agree to terms and conditions (which are totally safe to do) and then finally you’ll be done step 3. All you have to do now is click “Fund this account” and you’ll be moving onto the last and final step.
Step 4 – Fund Your Wealthsimple Account
[Estimated Time of Completion for Step #4 – 5 Minutes]
We are so close! Don’t stop now.
The last step is about connecting your bank account to Wealthsimple and then funding your account. So once you’re at this page shown below, click “Continue.”
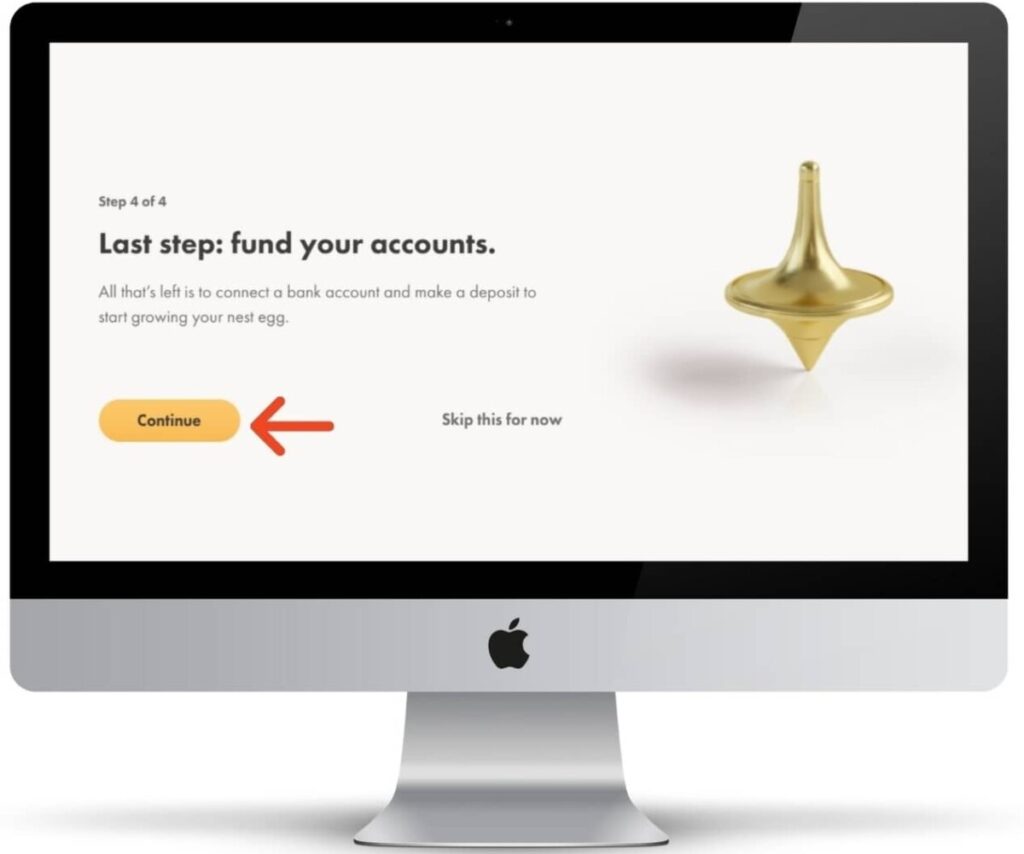
After that you will be brought to your new investment account! Wahoo. You’ve almost made it.
Now click “Make your first deposit.”
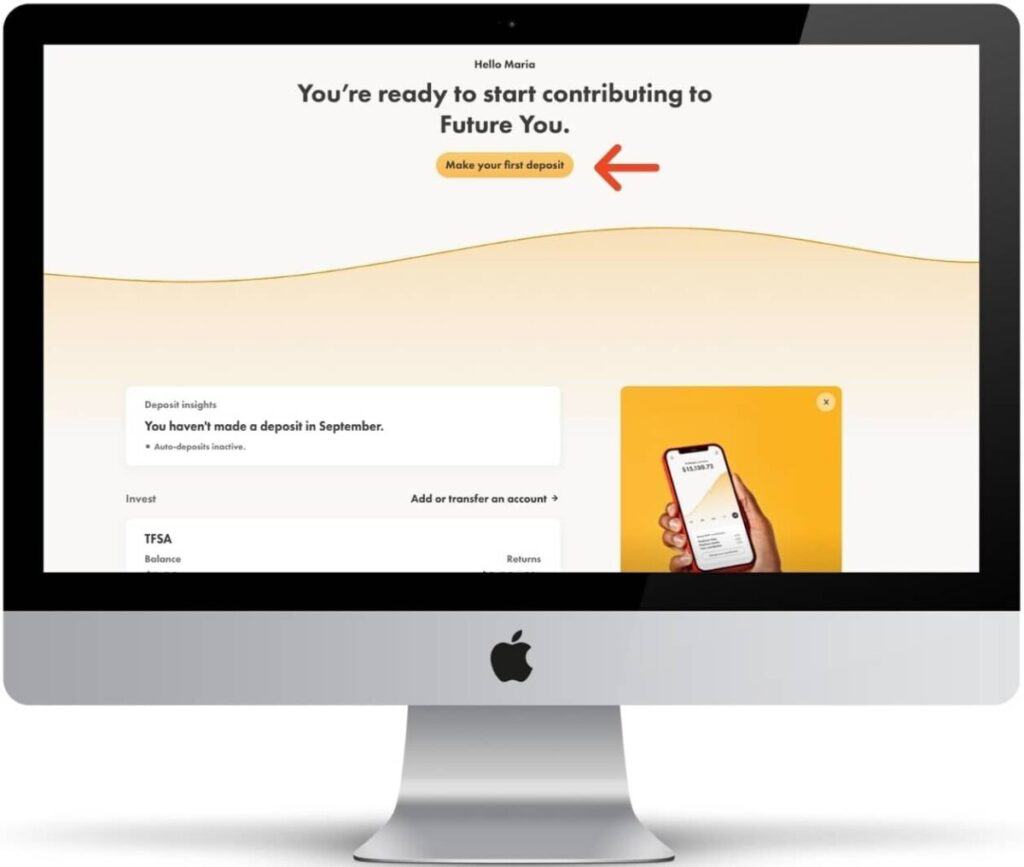
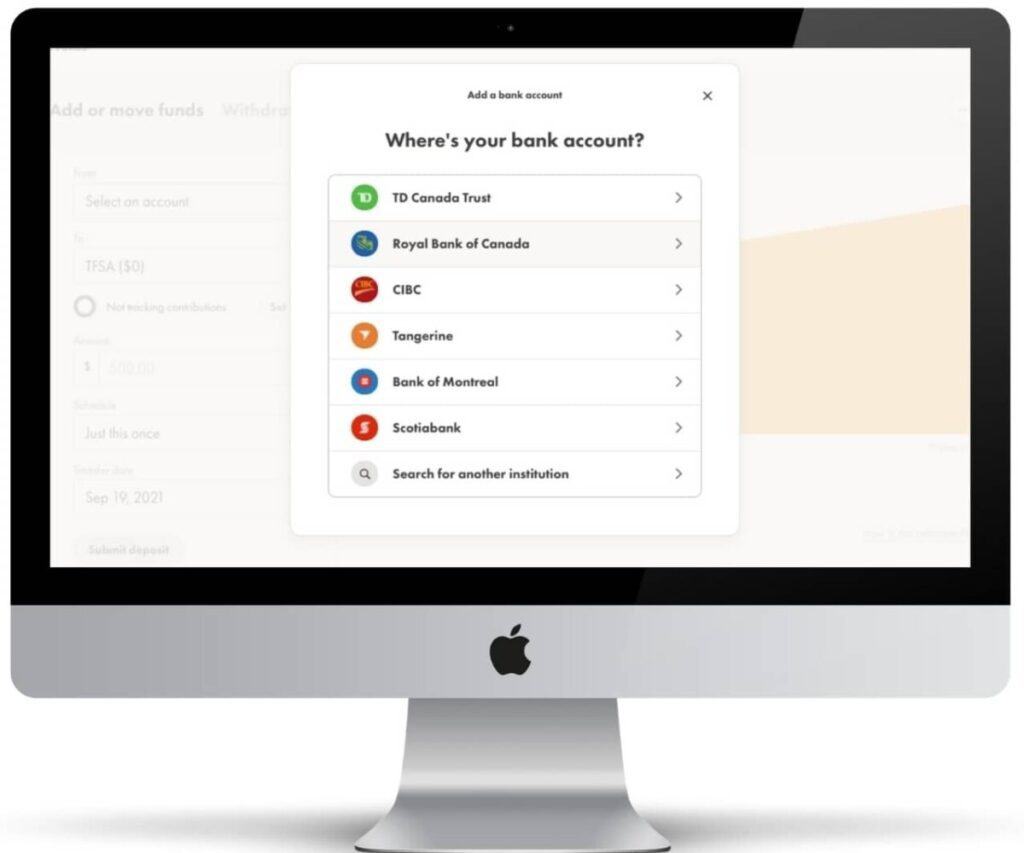
After clicking this you’ll be asked to add a bank account. Connecting your bank account to Wealthsimple is 100% safe to do.
Wealthsimple can connect to chequings accounts from all major banking institutions in Canada.
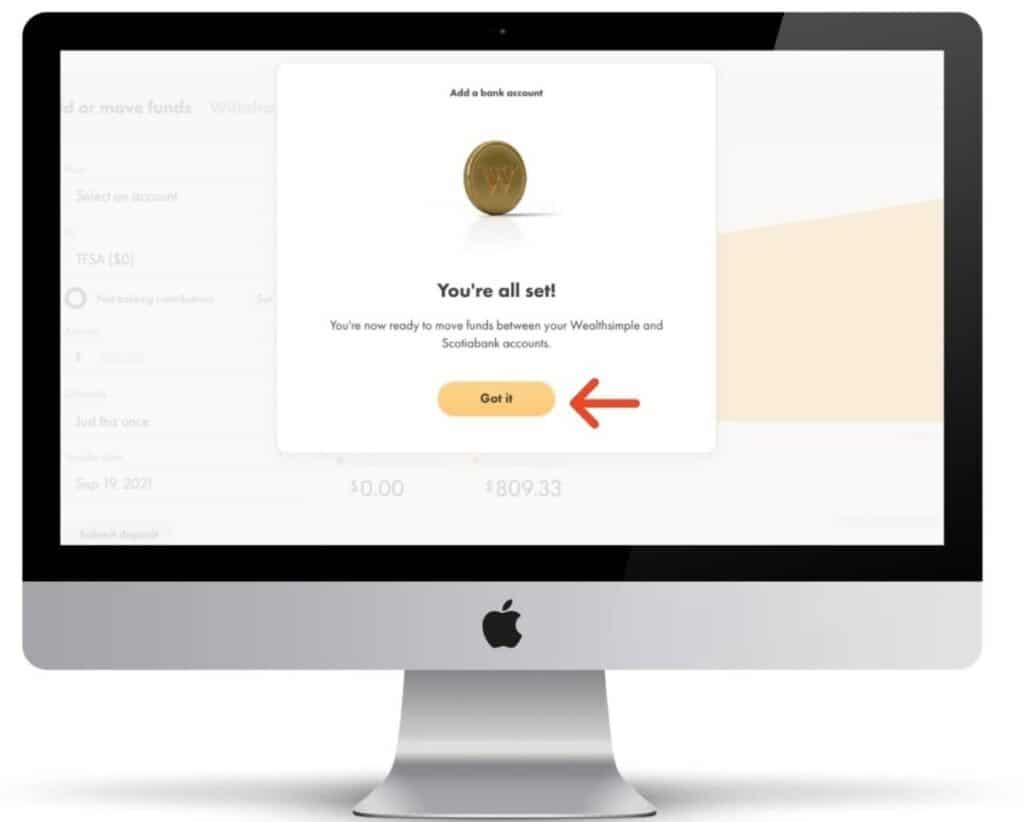
Once your bank account is successfully connected, you’ll see this screen shown below. From here, click “Got it“.
You’ll now be brought to this page shown below. The bank account you just added will be showing in the “From” section and the new investment account you just opened will be showing in the “To” section.
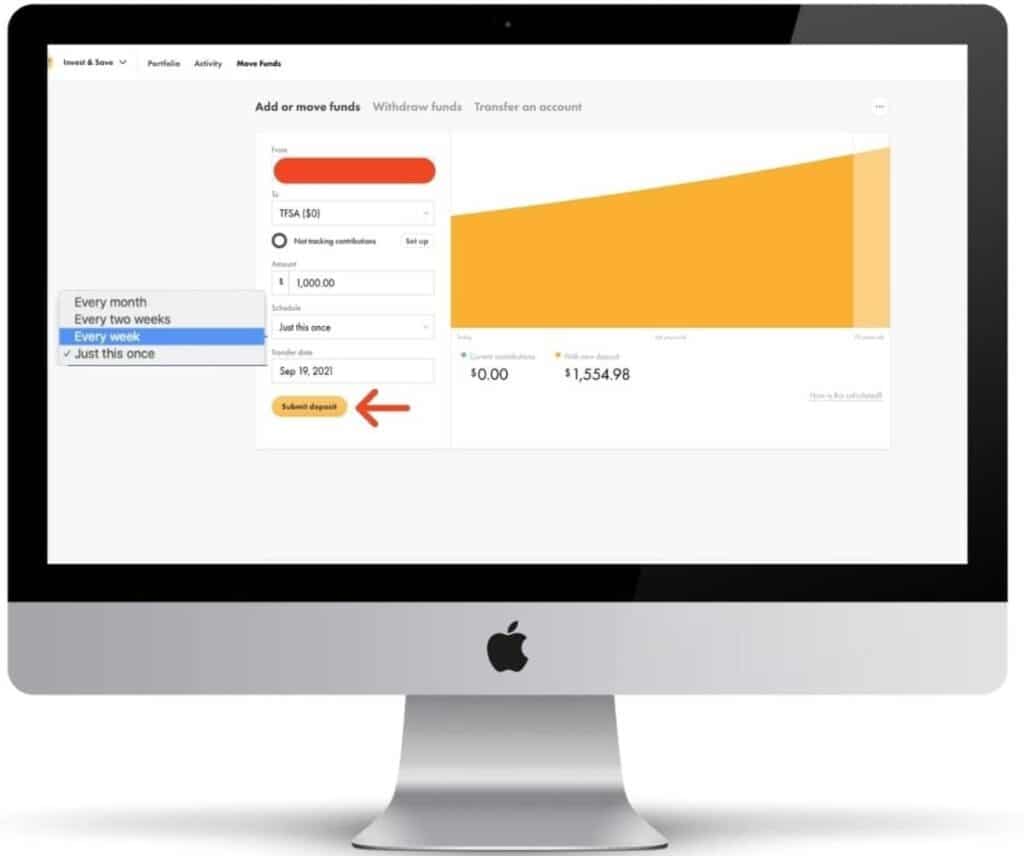
Now you’ll want to want to:
- Put in the amount you want to deposit in the “Amount” section.
- Schedule the deposit for (A)Just this once (B)Every week (C)Every two weeks (D)Every month.
- Select the date you want to make your deposit.
Finally click “Submit deposit” and you are done! It usually take 3-5 business days for deposits to go through.
Congratulations, if you’ve followed these steps, you have officially setup and funded an investment account with Wealthsimple.
Hopefully you found this resource helpful! If you have any questions about this process, contact me.
Geek, out


